|
Hope in stitch
|
As you may have read in a previous post - the Friends of Rowntree Park Craft Group are organising a Rainbows for Rowntree Park Yarnstorm as a big thank you to everyone who's helped us in these difficult times and as a celebration of the park itself. You can read all about it here. They would like you to make 6 inch/15 cm squares or flowers in one of the colours of the rainbow - red, orange, yellow, green, blue, indigo or violet - for a large rainbow display in the park. (Alternatively, you can make little whole rainbows which will hang in the arbour). These can be knitted, crocheted, stitched, embroidered or felted depending on your preference.
Just recently I have been working on an embroidered orange square of hope. Using some orange calico that was backed with iron-on vilene as a base...
 |
Calico backed with iron-on vilene
|
I cut out a piece a little bigger than 6 inches/15 cm square. Then I printed out the letters of HOPE on paper in an appropriate size and font, cut them out and used them as templates...
 |
Letter templates & Frixion pen
|
Using a Frixion pen (the ink disappears when you iron the fabric), I marked out the 6 inch/15 cm square, divided it into 4 and drew round the letters...
 |
Square and letters marked out
|
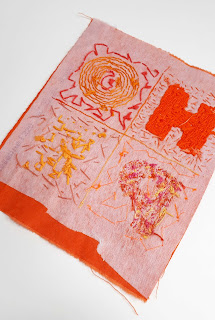
Then I started stitching by first completing the dividing lines between the letters. (I should also have stitched round the outline too as the ink faded and I ended up guessing where the edge was!) Each letter was completed in a different stitch. The letter was densely stitched and the surround was much more openly stitched...
 |
H in back stitch and seed stitch
|
 |
O in chain stitch and detached chain stitch
|
 |
P in French knots
|
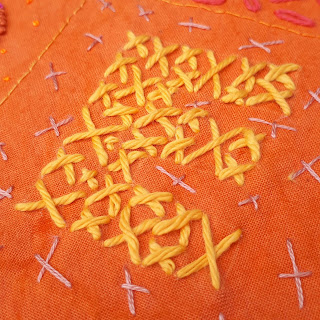 |
E in cross stitch
|
Here's what it looks like on the back...
 |
Messy reverse side
|
I cut out another piece of orange calico, added some ribbons to it in the corners as I thought they might be useful for attaching the square in the rainbow (if not required they can easily be cut off)...
 |
Reverse side with ribbons
|
Then I bonded the front and the back together using bondaweb, (an iron on adhesive), and cut it to the correct size. To finish off I machine stitched round the edge using a zigzag stitch...
 |
Finished orange square
|
Why not join in with the Rainbows for Rowntree Park Yarnstorm? The more people take part the better the display! You can make your squares as simple or elaborate as you like. Here's my yellow square in crochet...
 |
Yellow crochet square
|
and here are my knitted squares...
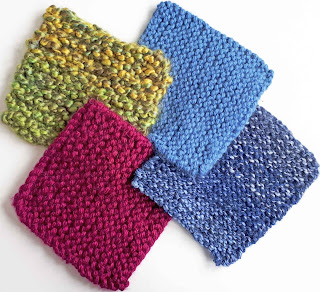 |
Knitted squares
|
Here are a few flowers I made...
 |
| Knitted and stitched flowers |
and here are some rainbows...
 |
Knitted rainbows
|
All the details can be found here. Your makes have to be delivered by the end of June and will hopefully go up in Rowntree Park in time to mark the Park's 99th Birthday on Saturday 18 July 2020. I can't wait to see your makes! Do post pics on social media using #RainbowsforRowntreePark.