Showing posts with label City of York Embroiderers' Guild. Show all posts

Sunday, 18 October 2020

Can-Do Crafts - Stitched Panel


The City of York Embroiderers' Guild is making a wallhanging for the Folk Hall in New Earswick, York to represent the groups that meet there.  I have been making the panel for the Can-Do Crafts group.  My brief included the size of the panel, that it should be landscape in orientation and that it must include the group's name.  Apart from that, I had free rein.  I spoke to textile artist, Deborah New, who took the group in 2019/2020 to find out what the group had been making.  It sounded like a great group to be part of - they'd tackled weaving, patchwork, felting, simple embroidery and stitching and other textile based crafts.  Deborah also promoted the use of recycling and upcycling in her teaching to make best use of resources.  (If you like the sound of Deborah's style, she is teaching a Hand Stitched Fabric Robins workshop on Zoom with York Learning on 28 November 2020.  You can find out more here.)

Blue/black denim base fabric

In keeping with Deborah's recycling ideas I used some blue/black denim from an old pair of jeans as the base fabric and hoped to use scraps and leftover fabrics, threads and yarns for everything else. 

Various Fonts

Starting with the group's name, I printed it out in a number of different fonts and sizes to see what would work with the panel size - something quite tall and not too wide was what I was looking for. It turned out that Bahnschrift Condensed fitted the bill! The printed out font acted as a template for the letters.  Next, using scraps of colourful patterned fabrics I ironed on bondaweb, a double sided fabric adhesive with a paper backing.  Then using the printed letters that I had already cut out, I reversed them, placed them on the bondaweb paper backing, drew round them and cut them out. 

Font Template and Cut Out Bondawebbed Letters

These were then ironed onto the base denim fabric after the paper backing had been removed.  I had zigzagged the edges of the denim panel to stop them fraying and had stitched a line round (to be removed later) beyond which I didn't want to go when adding the rest of the design so that it wouldn't get lost in the seams.  I allowed a little more than the seam allowance to be on the safe side.

Lettering Ironed in Place

I had chosen 3 of the techniques the group had learned to make small pieces to be part of the panel - weaving, patchwork and felting... 

Weaving

Patchwork

Small Felted Purse

Also, I thought it would be nice to add some text to the piece mentioning some of the techniques used.  This was done as though it was the thread coming out of a needle.  To make the needle, I ironed some bondaweb onto the back of a scrap of silver fabric and drew a needle shape, which was then cut out, ironed on and machine stitched in position.  Using tailors chalk I roughly drew a line where I wanted the stitching to be and set off.  I had a practice go on a spare bit of denim that helped me decide how to place the words.

Wording Complete

After that, I machine stitched round the letters of the group's name twice, and stitched the three sample pieces in position.  The patchwork piece was machine stitched on.  The weaving sample was hand sewn in position and the felt purse was attached with a combination of the two. As a final touch I added some simple embroidery stitches - chain stitch and cross stitch, that the group might have used in their work.  Finally I took out my stitching guidelines round the edge and the panel was complete...

Finished Panel for the Can-Do Craft Group

And now it's on its way to join the other panels.


Sunday, 7 October 2018

Faux Applique with Joanna O'Neill


Joanna O'Neill - Willow & Rowan

Joanna O'Neill recently held a workshop for the City of York Embroiderers' Guild on Faux Applique.  She brought lots of her beautiful work to inspire us...

Joanna O'Neill - Protection, Healing & Strength

Joanna O'Neill - Dragon Tree (part), Leaves & Lost in a Quilter's Garden

Then, equipped with Markal Paintstiks, toothbrushes and stencils created out of freezer paper (made either from Joanna's designs or our own), we experimented with light and dark fabrics to produce our faux applique designs...


Markal Paintstiks
Brushes!
Stencils
My faux applique designs

We put these to one side to thoroughly dry as this would take a few days.  Next, Joanna showed us her samples that had been hand or machine stitched in various ways to complete the faux applique effect.  Then, working on some samples that Joanna had previously prepared for us we stitched to create our own samples.

Joanna O'Neill - Faux Applique Samples

My stitched sample...


It was a very effective technique...


Other people's samples

Thank you, Joanna.


Sunday, 17 June 2018

Unusual Mixed Media Embellishments with Jessica Grady

My dyed mixed media embellishments - elastic bands, cable ties, cotton buds & more

Recently I went on one of Jessica Grady's "Make Your Own Mixed Media Embellishments" workshops which was great fun.  

Detail of Jessica Grady's work

More examples of Jessica Grady's work
 
Jess is an embroidery artist and is inspired by surface textures such as barnacles and peeling paint.  Her work is truly original, colourful and inspirational.  She describes her work as "encrusted" and makes her own embellishments out of all sorts of unusual materials.  Jess's work has been featured in various magazines - Fibre Art Now (Spring 2018), Reloved (Issue 54) and the Embroiderers' Guild members' magazine Contact (46), not to mention online at Mixed Up magazine & Art Reveal (Issue 38)...

 
Fibre Art Now & Reloved Articles

Jess taught us to make our own embellishments and provided lots of different materials to experiment with.  It was interesting to see how each material took up the colours. 

Dyed paper & tyvek

And when we were spray painting - the background paper ended up looking great too...
 
Painted metal, wood & plastic embellishments


We spent the day dyeing, painting, melting and foiling...

"Sequins" from melted plastic

 
Foil added to the painted embellishments


Now I have lots of interesting materials to work with - thanks Jess!  If you fancy doing one of Jess's workshops, you can see what's coming up here.

You'll be hearing lots more about Jess this year.  She has become the Under 30's 2018 Embroiderers' Guild Scholar and so will be exhibiting at this year's Knitting & Stitching Shows in London, Harrogate & Dublin & will be appearing at Art& in York as an installation artist. 

Some of Jess's work will be on display at the City of York Embroiderer's Guild Triennial Exhibition from 22-24 June 2018 at the Tithe Barn in Nether Poppleton, York. More details here.  Why not come along!

Friday, 8 June 2018

Postcard for the Embroiderers's Guild Stitching Together Exhibition

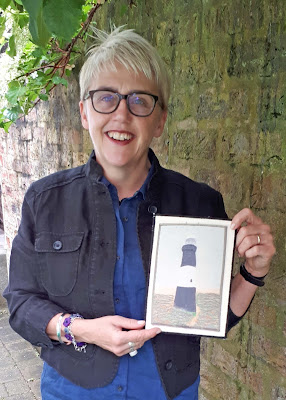
Holding the case that contains my postcard

Coming soon is the City of York Embroiderer's Guild Triennial Exhibition "Stitching Together" which will be held at the Tithe Barn, Church Lane, Nether Poppleton, York, YO26 6LF from Friday 22 June to Sunday 24 June 2018.  One of the exhibits is a series of postcards stitched by members which is also a competition.  Each postcard depicts a place and you have to guess where they all are.

 
Calico & pelmet vilene


My contribution is a postcard of a lighthouse that I chose to applique and stitch.  The lighthouse is one I have visited and that I have a photograph of.  (I haven't included the photo here in case it helps anyone guess where it is!)

 
Materials - dyed calico, cotton & yarn


The base of my postcard is calico bonded on to pelmet vilene which I then coloured with Inktense watercolour pencils and blended with a wet brush.  While this was drying I made a pattern for my lighthouse and cut out the various pieces from cotton and dyed calico that had bondaweb ironed onto it.  


Painted background and lighthouse pieces bonded on

Once the painted background had dried I peeled off the bondaweb backing paper and ironed the lighthouse pieces into position and machine stitched them in place.  Next, with a Frixion pen (which irons off) I drew on the extra details I wanted to stitch - the rail at the top of the lighthouse, the windows  and the pattern on the glass.

Lighthouse pieces machine stitched, frixion pen detail still visible

With this element of the machine stitching finished, I chose some yarn for the vegetation, laid it on the postcard and free machined it in position.  
 
Vegetation stitched in position


At this point I thought the background colours needed strengthening so I added some more Inktense colour.  When dry I hand stitched some extra vegetation.

Background recoloured and more vegetation handstitched

Then I machine stitched the front of the postcard to the back with a zigzag stitch.  The back of the postcard was piece of natural calico bonded to pelmet vilene.  Afterwards I printed off a copy of the postcard onto fabric and made a container to keep my postcard safe.  That's me at the top of this post holding the container that my postcard's in.

Finished postcard

Do you know where it is?  If you do, don't tell anyone - come along to our exhibition and enter the postcard competition and guess where they all are! 


The exhibition is open on Friday 22 June & Saturday 23 June from 10am to 5pm and on Sunday 24 June from 10am to 4pm. Entrance £3.  There will be tea & cakes!  Hope to see you there. 


Friday, 15 September 2017

Stumpwork with Kay & Michael Dennis

Kay Dennis - Mouse in a Blackberry Bush (Stumpwork)
 

Recently Kay and Michael Dennis came to talk to the City of York Embroiderers' Guild about Stumpwork.  Stumpwork is a type of raised embroidery, using an array of different materials and embroidery techniques, including needlelace. Stumpwork came to England in the 17th century and was done by teenage girls of the aristocracy.  Then it was known simply as raised embroidery.

Kay learned to embroider as a child and learned stumpwork from Barbara & Roy Hirst.  She has even got her husband, Michael, hooked on the technique.  You can hear Kay talking about stumpwork and Barbara & Roy Hirst here.

Here are some examples of Kay & Michael's work...

Kay Dennis - Toadstools

Kay Dennis - Stumpwork casket showing detail to sides and lid
 
Michael Dennis - Fantasy Bird

 
Kay Dennis - Acorn & Berries


The following day, I got a chance to try my hand at some stumpwork at one of their workshops with a seabird theme. 

Kay Dennis - Sea Birds


Kay Dennis - Seabird & Lobster Pots

Kay had some lovely examples of birds at the seaside.   Our aim was a water's edge picture.  We began by painting some puddles onto our calico and then adding some rock shapes in vilene which were stab stitched in place.  Next they were covered in stitch using embroidery threads.  After that we added the body of our seabird.  The body was made up of layers of felt which was then covered in leather...
 
The beginnings of a stumpwork seabird


Next came a needlelace wing...

Needlelace wing in progress

As you can see it's very much a work in progress.  Lovely to have a go at something I've never tried before.  Thanks Kay and Michael!


Tuesday, 29 August 2017

The African Fabric Shop & Maggie Relph


Maggie Relph from the African Fabric Shop came to talk to the City of York Embroiderers' Guild.  She told us about the African artisans she visits and the many techniques they use to produce their fabulously coloured cloths.  Some tie and stitch the fabric before dyeing.  The threads are removed by cutting them with razor blades.  

Tied fabric ready for dyeing

Others use starch as a resist.  Parafin wax is becoming more popular and can either be stamped onto fabric, used with stencils, spattered or painted on with a variety of improvised tools. Alternatively it might be painted all over and then the fabric scrunched up before dyeing.  Stitch resist type designs can be recreated using wax stamped onto the fabric using carved foam stamps.  This is a more cost effective method. The wax is removed by putting the fabric in boiling water followed by cold water then the wax can be picked off.  This may be done several times. 


Indigo is used by some dyers although dark blue commercial dyes that look like indigo are increasingly common. Dye made from the cola nut which produces an orange colour can be used with indigo.

 
Some patterns may involve three different dye baths.  Some artisans dye using white fabric and others overdye commercially dyed fabric.  Most of the fabric comes from China and often has a damask weave and may incorporate African symbols in the weave.
 
 
We had the opportunity to handle many of Maggie's fabric samples as well as some fabulous decorative baskets and buttons and beads too.

Decorative baskets

If you are looking for something out of the ordinary why not check out what the African Fabric Shop has to offer.